Friday, February 22, 2013

Snow Day Adventures: Maple Syrup Snow Candy

I've wanted to make snow candy ever since reading Little House on the Prairie as a tiny person. Mom and I never managed to make this on our snow days when I was a kid, I guess we stuck to mac'n'cheese and making snowflakes and fleece hats. Thanks, Martha!

Our sweet neighbor's rotund squirrel friend

Finally, I did! This is so much fun and perfect way to play in the 14.5" of snow in our back yard. We've had a huge pile of snow in the last 48 hours here in the Kansas and I'm sure there are lots of parents wondering just what to do on their second snow day in a row.


Wait, what? Snow days? What are those? We've barely had any moisture here, let alone feet of snow. Kansas is really making up for lost time.


Stake out some fresh snow and get bundled up before you start in the kitchen and you'll have snow candy before you know it. You can always pile up some fresh snow in a bowl or on a large plate, just be sure to leave it outside to stay cold. Grab those kids, your neighbors, or grandma and go play!


Maple Syrup Snow Candy:
2/3 cup maple syrup
2 tablespoons salted butter

In a small sauce pan, bring syrup and butter to a boil. Continue boiling until the mixture reaches 236 degrees F. Allow the boiling to subside before heading outside with a plate.

Slowly drizzle the maple mixture onto the snow, making any design you want. Allow the candy to cool and set up in the snow. Make a few snowballs while you wait.


Pull the candy out of the snow and set on the plate. Launch those snowballs you made.


Bring the candy inside and set out on wax paper. Go back outside and throw some more snowballs. Come back inside and peel off a piece for yourself. At first it will seem sticky, but will quickly melt in your mouth. Eat it up quickly before it begins to settle and soften. There's no shame in scraping it up with a spoon.

If you're feeling extra adventurous, drizzle this over homemade snow ice cream. Real maple syrup a little rough on your budget? Check out this post on how to make your own!

Tuesday, February 12, 2013

Chocolate Sandwich Cookies with Chocolate Marshmallow Filling for Valentine's Day

Valentine's Day isn't usually a big deal in our house, but that doesn't mean we don't want a special treat to share.
This is an easy treat to make, with chocolatey goodness that isn't too sweet. These cookies are tender and soft, almost fudgey, with a pillowy soft marshmallow center.
I've still been making at least one batch of marshmallows a week, so chocolate marshmallow filling was an easy choice. Valentine's Day is about chocolate, right?

Be more generous with the filling than I was, there is plenty to go around.
This recipe makes six large (approx. 4 inches across) sandwich cookies, just enough to share with your Valentine. Get into the kitchen with your Valentine and share this chocolate treat together!

Chocolate Sandwich Cookies with Chocolate Marshmallow Filling:
Makes six four-inch sandwich cookies

For the cookies:
1 cup plus 1 tablespoon flour
1/4 plus 1 tablespoon cocoa powder
1/8 teaspoon baking soda
1/8 teaspoon salt
1/2 cup butter, softened
1/4 plus 1/8 teaspoon sugar
1 egg yolk
1/2 teaspoon vanilla

For the filling:
1 cup sugar
1/2 cup cold water, divided
1 package gelatin
1/3 cup quality semi-sweet or dark chocolate, finely chopped


Preheat oven to 350 degrees. Whisk together dry ingredients and set aside.

Cream butter and sugar together until light and fluffy. Add egg and vanilla and mix until well incorporated. Slowly add dry ingredients to wet ingredients and mix until just combined.

Scoop dough into a ball and wrap with plastic wrap. Chill for 1-2 hours until firm, but not hard. When the dough has chilled, allow to rest at room temp for 5-10 minutes before rolling out. Roll dough out between two pieces of plastic wrap to 1/8th inch think. Cut out an even number of cookies.

Bake cookies for 7 minutes on parchment paper. Allow cookies to cool on sheet for 3-4 minutes before moving to a rack to cool completely. If necessary, roll the dough out just once more and repeat with remaining cookies. When the cookies are completely cool, begin the marshmallow filling.

In the bowl of a stand mixer, sprinkle gelatin over 1/4 cup of the water to bloom. Combine the remaining water and sugar in a sauce pan, stirring to dissolve the sugar. Heat water and sugar over medium-high heat to 240 degrees (firm ball). Remove from heat and allow boiling to subside.

With the whisk attachment and mixer running on low, slowly pour sugar syrup down the side of the bowl. Slowly increase the speed of the mixer to high. Whip marshmallow until it begins to double in size, but the bowl is still slightly warm. Add chocolate to bowl, the residual heat of the marshmallow will melt the tiny bits of chocolate. Continue whipping until the marshmallow is thick.

Working quickly to prevent the marshmallow from setting, transfer filling to a piping bag with a large tip and pipe filling into half of the cookies. Top with remaining cookies.

Grab your Valentine and enjoy!

Friday, February 1, 2013

Classic Slow-Cooker Chili

Here's an uber-classic for your Super Bowl Sunday.


Super easy so you don't have to spend too much time in preparation, something you can walk away from and not worry about. 


Super tasty.
Super customizable. Make it as spicy as you want!


Set up a toppings bar with shredded cheddar, chopped green onions, light sour cream or Greek yogurt, and avocado slices. A little something for everyone!

Whatever you do, don't forget the Fritos scoops. 

Classic Slow-Cooker Chili:
1 pound lean ground beef, browned and drained
1 medium yellow onion, diced
3-4 garlic cloves, minced
1/2 cup dried black beans, sorted and rinsed
3/4 cup dried red kidney beans, sorted and rinsed
1 28 oz can diced tomatoes
1 28 oz can crushed tomatoes
2-3 cups beef stock or broth
1-2 teaspoons ground cayenne pepper
1-2 teaspoons ground red pepper
salt and pepper to taste

Layer all ingredients in a large slow-cooker, adding just enough beef broth to make the beans float. I prefer a thick chili and tend to add just about 2 cups of stock. Stir all ingredients to combine and cover. 

Cook on low for 8 hours or on low for 6 hours. After about 4 hours, check the consistency and beans for doneness, adding more stock if necessary.

Grab a bowl and a seat for the game!

Friday, January 25, 2013

Slow Cooker White Chicken Chili

I'm in total denial that about winter.


Even though I've been happily knitting up a storm for my sweet cousins, friends, strangers on the street. Is Katie cute or what?


Winter is my arch-nemesis and it certainly shouldn't be this cold without snow. Without snow! Seriously, Kansas, give us something prettier to look at than our dry, brown front yards. We need one serious whiteout with snowmen that don't melt for weeks before spring comes. When our snow finally comes, you'll find me under a blanket fort huddling with the cats. And a bowl of this chili.


This is one of my favorite ways to warm up from the inside out. Ok, so its my second favorite. My obsession with marshmallows has not subsided.

Even though I much prefer to spend my time in the hot box of a Kansas summer, this chili is a close substitute in these chilly months. Crank up the jalapenos and you'll have your own personal summer. Go ahead, sweat it out at the dinner table.


Chili when you're chilly, its meant to be. Grab a bag of Fritos scoops while you're at it, just think about the spoons you won't have to wash.

Slow Cooker White Chicken Chili:
Makes about 8 servings

1 1/2 - 2 pounds bone-in chicken leg quarters, or whatever chicken you have on hand
1 medium yellow onion, chopped
1-2 jalapeno peppers, minced
1 - 1 1/2 cups dry white beans
6 cups water
1-2 Parmesan rinds, optional
salt and pepper to taste
shredded Pepper Jack or Mozzarella cheese to garnish

Layer ingredients in slow cooker in order. If the chicken quarters have the skin on, you can remove the skin before or after the chicken is cooked. Leave the skin on for flavor and skim the fat before serving. 

Cook on high for 6-8 hours, on low for 4-6 hours. 30 minutes before serving, remove the chicken and set aside to cool a bit before boning, leaving the lid off the slow cooker. The bones should slide right out of the meat. Using tongs or your hands, remove any extra fat and shred the meat. 

By this time, a lot of the fat should have risen to the top of the pot, skim the fat with a shallow spoon and discard. If you want to thicken the soup, whisk a 1/4 cup flour or cornstarch into 1 cup of hot broth until smooth and then stir into the soup. Add chicken and serve with a sprinkle of cheese.

Enjoy!

Friday, December 7, 2012

Edible GIfts: Microwave Popcorn Packs

We've talked about this before, I really love microwave popcorn. My mom's Whirly Pop still makes the best popcorn, but this microwave popcorn comes a very close second. This microwave popcorn gives you crunchy, salty popcorn without a pot to clean. No clean up is always a plus, right?


My family loves movies and they're often a part of our Christmas gifts. These packs would be an perfect addition to a movie gift.


The flavor combinations are endless. Go spicy with a pinch of garlic powder and ground cayenne. Get sweet with a sprinkle of sugar for kettle-style popcorn. Make up a double batch and stash a few in your own cupboard or desk at work. Package a pile of these up to share with your neighbors and friends. These are easy on your time and your wallet, so you can always make these last minute.


Microwave Popcorn:
Makes 4 packs

1 cup popcorn kernels
1-2 teaspoons vegetable or canola oil
1 teaspoon sea salt
4 snack-sized zip bags
4 paper bags
card stock or recipe card for directions

Add popcorn kernels to a small bowl and stir oil in one teaspoon at a time, until kernels are just coated. Stir in salt. Divide kernels into the zip bags and tuck into paper bags.

Write directions on card stock or recipe card:

1. Empty contents of zip bag into paper bag
2. Fold edge of bag over twice and lay flat in microwave
3. Microwave on high 2-2 1/2 minutes until popping slows
4. Empty into a bowl and enjoy!

Wrap up your popcorn packs with cellophane or tissue paper and start sharing!

Friday, November 30, 2012

Edible Gifts: Homemade Hot Cocoa Mix and Peppermint Marshmallows

Need a quick gift idea in your back pocket this season?


You can put together a gift package of homemade hot cocoa mix and peppermint marshmallows before you know it.


Yes, I said homemade peppermint marshmallows. Don't let the marshmallows scare you.
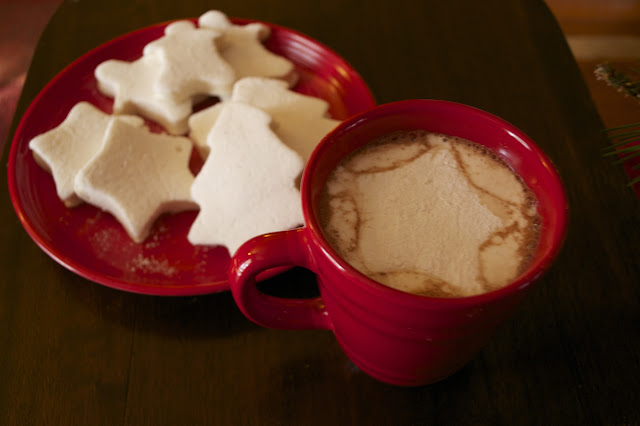
These puffy soft clouds of sweet Christmas cheer are easier than you think. In about 30 minutes of active time, you will have pillowy marshmallow creme ready to set up over night.


The magic of chemistry make the process so fun. As you whip air into the gelatin and sugar mixture, it slowly transforms into marshmallow creme. If you have kids, grab them to help you cut them out with cookie cutters. To make them even easier, use a sharp knife to cut them into squares.

The hot cocoa mix can be done in a matter of minutes with the help of a blender or food processor. To package the hot cocoa mix, grab an empty baking powder or lemonade canister out of the recycle bin and cover with wrapping paper. Wrap the marshmallows in a square of parchment paper and tie with ribbon.


Hot Cocoa Mix:
Makes about 1 1/2 - 1 3/4 cups mix, enough to fill one baking powder canister

1 1/4 cup dry milk powder
1/4 cup cocoa powder
3/4 cup sugar
1/2 teaspoon cinnamon (optional)
1/4 teaspoon nutmeg (optional)

Combine all ingredients in a blender or food processor and pulse a few times until well combined. Store in an airtight container.


Peppermint Marshmallows:
Makes 9-10 marshmallows using medium-sized cookie cutters

1 cup cold water, divided
2 packages unflavored gelatin (I used Knox)
1/3 cup honey
1 1/3 cup sugar
1 teaspoon vanilla
1/4 teaspoon peppermint extract
1/2 cup+ powdered sugar for dusting

Grease and dust a 9 x 13 pan with powdered sugar and set aside. Sprinkle gelatin over 1/2 cup cold water in a bowl and set aside to soften. Use the bowl of your stand mixer if you have one.

In a medium sauce pan over medium-high heat, bring remaining water, honey and sugar to 240 degrees using a candy thermometer. Once the sugar mixture is boiling, this could take 5-10 minutes.

Prep your stand mixer or blender with the whisk attachment or the smallest beaters available. When the sugar mixture has reached 240 degrees, slowly pour into gelatin mixture with machine on low. Continue pouring and increase speed slowly to high.

Beat marshmallow creme until doubled in volume, about eight minutes. Add vanilla and peppermint extract and continue beating until thick, about two more minutes. Ribbons in the marshmallow creme should disappear in about two seconds.

Pour marshmallow creme into prepared pan and dust top with more powdered sugar. Allow to set up for at least four hours or overnight. Turn marshmallow out onto a cutting board and cut into squares with a sharp knife or cookie cutters. Toss with powdered sugar to cover cut edges. Store in an airtight container for two to three weeks.


Put together a batch today and spread some Christmas joy with those cherished people around you. Don't forget to cut up those marshmallow scraps for your self, they all melt just the same.

Monday, November 19, 2012

Thanksgiving Lasagna

I am so excited for Thanksgiving this year.


This year we'll be blessed to have three Thanksgiving dinners. That means more turkey and gravy. More pan gravy with my granny's secret weapon: sake. Seriously, try it friends. Thanksgiving with my family is always full of pieces of her. She didn't just pass on recipes, but technique, style, and attitude. Thanksgiving seems to pull it all together into a giant food memory. 

As I slid this lasagna into the oven, I knew she would have loved it. I know you will, too.


This lasagna is an excellent way to change it up before, during or after Thanksgiving. Most of the ingredients are already in your kitchen as you prepare for the holiday. Its full of fall flavor with turkey, pumpkin and sage, then topped with mozzarella and fried sage leaves. Use leftover turkey instead of ground turkey for a great twist on leftovers. 


Make, bake and share this lasagna and have a blessed Thanksgiving.


Thanksgiving Lasagna
Serves 8

1 tablespoon olive oil, divided
20 oz. ground turkey
8 leaves fresh sage
1 medium yellow onion, diced
1 teaspoon salt
2 teaspoons dried sage
2 (15 ounce) cans pumpkin puree
3/4 cup chicken stock
20 ounces ricotta
8 ounces mozzarella, cut into 1 ounce slices
1 package oven-ready lasagna noodles

Grease a 9 x 13 pan and set aside. Heat oven to 350 degrees.

In a large pan, brown turkey over medium heat with 1 teaspoon olive oil. Remove turkey from pan, drain and set aside. Add remaining olive oil and pan-fry fresh sage leaves. When the sage leaves are crispy, drain on a paper towel and set aside. 

Add onion and salt to pan, scraping to remove all the crispy bits from the bottom. Cook until onions are fragrant, about 3 minutes. Add dried sage and continue cooking another two to three minutes. Remove from heat and add turkey to onion mixture. 

In a medium bowl, stir together pumpkin and chicken stock.

In the pan, make three layers of the pumpkin, noodles, turkey mixture and ricotta. Top with another layer of noodles and pumpkin. Arrange mozzarella slices and fried sage on top.

Cover with foil and bake for 30 minutes. Uncover and continue baking another 15 minutes or until mozzarella begins to brown and lasagna is bubbly. Allow to rest 5-10 minutes before serving.


Friday, November 16, 2012

Lighter Honey and Brown Butter No Bake Cookies

The biggest lesson from the last month: brown butter makes everything better.


Absolutely everything.

Jessica over at How Sweet Eats feels the same way. Not only is Jessica full of wit, but she shares fantastic recipes and photos. If you've never browned butter before, jump over to her post here to see how its done.


A lot less sugar and a little more honey come together to lighten up one of my favorite fast treats. These can become lunch box staples. Just whip up a batch and divvy them up in little snack bags. They'll be ready for you in a pinch. 

Remember, these are still cookies, but a sweet treat you don't have to feel bad about. 


A quick and easy treat to combat the pies you might be making in the next week. Or maybe in addition to those pies. 

Lighter Honey and Brown Butter No Bake Cookies: 
Makes 12-14 medium-sized cookies

1/4 cup butter, browned and slightly cooled
1/4 cup brown sugar
1/2 cup honey
1/4 cup milk
2 tablespoons cocoa powder
1/3 cup peanut butter
1/2 teaspoon vanilla extract
1 1/2 cup quick cooking oats
2 tablespoons flax seeds, ground

Line a baking sheet with wax paper and set aside.

In a small sauce pan, brown the butter. Set aside to cool. 

In another small sauce pan, add brown sugar, honey, milk, and cocoa. Bring to a boil and continue to boil for another minute. Remove from heat and stir in browned butter and peanut butter, stirring to melt the peanut butter. Stir in vanilla. 

Pour cocoa mixture over oats and flax seed, stirring to combine. Drop by the spoonful onto lined baking sheet. Allow to cool and set up on the counter for 2 hours or in the refrigerator for 30 minutes. Store in an air tight container.


Tuesday, September 25, 2012

Coffee Creamer Three Ways

Its been too long friends, way too long. A crazy project knitting away at a gazillion hats for my drumline students between rehearsals has swallowed up so much of my time. Now that I'm able to tread water in this sea of purple yarn, I am back with a few classic fall recipes.

You'd like to see these kids, right?
Look, kids wearing purple hats!
New uniforms and a new positive attitude to boot.

So what's that I said about classic fall recipes? We all know fall is here when pumpkin spice is everywhere, especially in our coffee. As I was staring at the tiny ingredient list for my favorite coffee creamer, I couldn't help but wonder just what on earth I was doing buying this at the store. With just four ingredients, surely I could make this go-juice at home.

The best part of the recipes is that with so few ingredients, its a snap to adjust for your own preferences. You just might have to go dig in the recycle bin for a few old bottles to store all this creamer.I may *or may not* have nearly fallen into the recycle bin mining empty creamer bottles.

Sweet Vanilla Creamer:
1 cup 1% milk
3/4 cup half and half
1/3 cup sugar
1-2 teaspoons vanilla

Whisk all ingredients together and taste. Adjust sugar and vanilla to your preferences. Store in a container with a tight lid in the refrigerator and shake well before using.

Ok, ok. So vanilla doesn't exactly say fall quite like pumpkin. I couldn't just send you on your merry little way with only one creamer recipe. It just wouldn't be right.

Pumpkin Spice Creamer:
1 cup 1% milk
3/4 cup half and half
1/3 cup sugar
1/2 cup pumpkin puree
1-2 teaspoons pumpkin pie spice

Whisk and taste some more. For a little extra sweetness or depth of flavor, add a touch of maple syrup or molasses. Remember the pumpkin and spices will settle, so be sure to shake well. Want to take a crack at your own pumpkin spice blend? Check out the oh-so-sweet Joy the Baker's recipe here.
Tuxie sat on my lap until the camera came out.

Oh.
What was that about maple syrup?

A little maple syrup in the cream cheese frosting on sticky buns is one of my favorites. Let's run with that, too.

Sticky Bun Creamer:
1 1/4 cup almond milk
1/2 cup half and half
1/4 cup 100% real maple syrup
1 tablespoon brown sugar
1-1 1/2 teaspoons cinnamon

Whisk and taste one more time. Dream up your own flavors, use real ingredients. Grab some Hershey's chocolate and peppermint extract. Go crazy!
Soak up the weather, cozy up to a fire and share a bit of delicious coffee with your friends. Whatever you do, find a cat to ignore you.

Friday, August 10, 2012

Thai-style Salsa

Hey friends!
We're back!

Let's get this show back on the road with a fun new recipe. Thai-style Salsa! If you're anything like me, you're impatiently waiting for jacket weather, mountains of chili and football. This salsa is a great Sunday afternoon snack for cheering on your favorite team or to share with your friends.

Thai-style Salsa:
1 28 oz. can diced tomatoes, salted and drained
1/4 cup coconut milk
1 handful Thai basil
2 shallots, minced
2-3 cloves garlic, minced
1 1/2 - 2 inches freshly grated ginger
5-6 Thai chiles, diced
juice of half a lime
1/2 teaspoon turmeric


To salt and drain the tomatoes, place tomatoes in a fine mesh strainer over a bowl and add a heavy pinch of salt. Allow to drain for about 15-20 minutes. Use the tomato water for something like this.

Put all ingredients in a blender or food processor and blend to combine. Add more chiles or
salt to taste.


Serve with your favorite corn chips and enjoy!